Evolution of Design

Our initial design began with the overall learning objective to teach heatflow in a cold environment. In order to inject a sense of danger to the scenario, it was determined that the players must be struggling for survival out in the unforgiving wilderness during winter. Setting them in that situation without any real hope for immediate rescue first came from a resulting plane crash over snowy terrain. This idea emerged during a very early development phase in which there had been no thought of a single player campaign before the multiplayer experience. Players would simply be thrust into this situation and would need to figure out how to construct a shelter for themselves based on extrinsic knowledge. From an educational standpoint, that was more of a homework exercise than an actual teachable moment. We needed to give students the tools to figure this out within the game; this is where KSBs emerged, as well as a new premise for the game itself.

Teaching the students about the heatflow formula one piece at a time meant that there would need to be several levels – each potentially comprising of smaller pieces to convey each variable in the formula. However, we needed a reason for the players to be completing these tasks. The new overarching goal turned into a reality television show, heavily influenced by the survival series on Discovery. Players would now be vying for their shot to host a tv show of their own, but only if they were able to complete a series of challenges themselves; essentially taking part in a reality show to host a reality show. While the premise did give cause for players to learn the new objectives, there was very little tie-in to STEM professions as a whole. Ultimately we changed the final story to reflect the idea of making a career out of the learning that was happening in game. Survival Masters were now government employees whose sole job was knowing this information and using it in the field. Players became trainees in the Survival Master government program, competing against other trainees for a coveted spot on a tactical government team. This allowed us to keep some of the more outlandish aspects of the reality television show challenges and locations, as a sort of hazing for new recruits. With all the changes that we have seen, it is important that we assemble all these scattered design pieces back together.

We are now in the process of recompiling all documentation that has accumulated over the past years, and setting it into a single Game Design Document. To do this, we will be drawing upon various sketches, workflows, word documents, discussions, and even the prototypes themselves, to make sure that the vision is completely synced together into one cohesive draft. This will help us to iterate later on with the transfer over to Unity 3D, so that no aspects of the game are lost in translation. We will also be able to use this document to iterate on the gameplay itself as we work from beta versions to the gold candidate.

Creating a Character: Part 2 – The Rough Form

Continued from Part 1 – The Concept

With the concept done, it was time to get a rough model built. My first couple of attempts were failures. I was unhappy with the flow of the mesh, and when I tried to extrude limbs from it things just kept getting worse. It got me thinking back to something I heard from one of my professors in college… in essence: “Extruding garbage produces more garbage.” It is important to start with a solid foundation and go from there so less time is spent in the later stages cleaning up the mess.

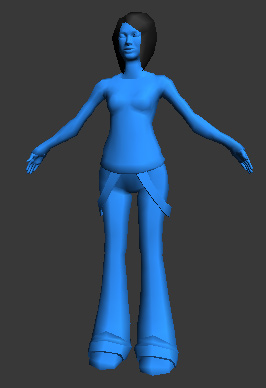
On my third restart, I finally started to get the hang of things. From there it was just a matter of adding detail and doing minor cleanup until I produced something close to the grey shirt version of the female character.

The rough modeling process for Survival Master's female player character

Yellow: Version 1, Green/Purple: Version 2, Pink: Version 3, and Blue: Pink Mesh pieces combined into one

To speed up the process, I grabbed the face and hands from an old female character we were using with the intention of replacing them with newly modeled parts later on down the line.

At this point I wanted to add a jacket. Unsure of the best method, I simply copied her torso and cut away all portions that weren’t jacket.

Rough jacket for the female player character in Survial Master.

Fitting the jacket to the female player character.

After some fiddling, I wasn’t entirely happy with it so it got put on the backburner until I had more time to get it right.

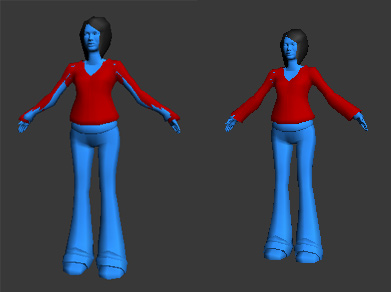
Final rough female player character for Survival Master

The final version of her before moving out of the "Rough" phase of modeling

Continued in Creating a Character: Part 3 – Refining and Texturing

Creating a Character: Part 1 – The Concept

It’s been fun and rewarding to work on Survival Master over the years, and recently I had the good fortune to get tasked with creating new player characters for the game. This is a challenge for me since I have mostly done props modeling and 2D concept art, but I was eager to give it my best.

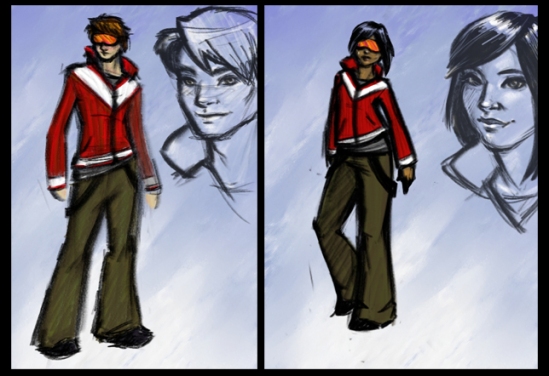
The first order of business when creating a character is to get some solid concept art going. I focused on the female player character first, but needed to keep in mind that we would eventually want a male counterpart in the same style. So, I did a few quick concepts of what both would look like and this is the image I submitted for approval.

initial concept art for the male and female player characters for Survival Master

On getting the “OK” from the team, I moved forward with the design. The next step in the process was to create a front and side view of the character so that I had a good base to model from. Since this was my first time modeling a full character, I fumbled a bit at this step. I attempted to create a human figure in 3DS Max from photo reference to move things along faster. After realizing this was a bad idea since I did not yet have a good character workflow down (or any character workflow for that matter), I ended up backtracking to the concept phase so I could have a clearer direction on where to go during the modeling phase.

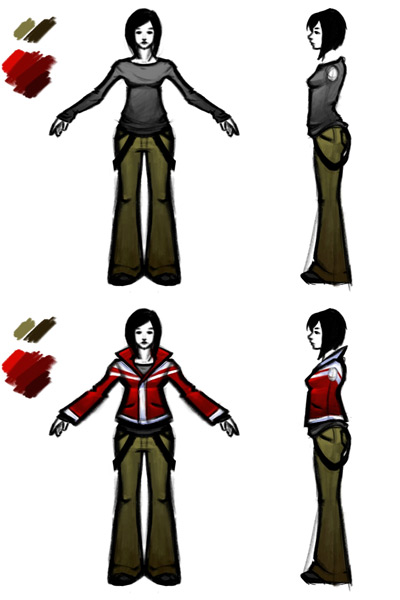
This turned out to be a wise decision. I was able to get a general idea of where I needed my edges to go and what type of structure the character body had as I drew the orthographic views. It really forced me to slow down and think about what I needed to do before I jumped into the deep end and started modeling. With future character customization in mind, I drew two versions of the female character.

front and side views of the female player character

After that, I was back up and ready to get her built… Continued in Part 2 – The Rough Form.

Survival Master Concept Art Gallery

When creating art assets for Survival Master, the development team will generally use a mix of both reference photos and concept art to get our ideas across to the producer and other members of the dev team. Once ideas have been approved then the team gets to work on building, texturing, lighting, and exporting the assets for use in the game.

Here is a selection of concept art from our Senior Environment Artist, Ty Hegner, and our Art Director, Cecilia Mason. Click on the small images if you’d like to see them bigger and in more detail. The links will bring you to our Flickr gallery where you can see them in all their web-sized glory.

Concept art of the starting area for KSB4 Concept art for the collectable materials in the Multiplayer Thumbnail sketches of environment pieces for KSB4 Sketch of the Avalanche Concept art for the starting area of the Dead Load obstacle in KSB4 Possible designs for the look of collectible materials in the multiplayer Cave of Volume Entrance during the Multiplayer Map of the Multiplayer level Sketches of a potential redesign of the Cave of Volume Launcher for Bomb Bowling in KSB2 Thumbnail sketches of Spinner Silhouettes for KSB2C Environment Concept Environment Concept Early thumnail concept of a facility Sketch of the Labyrinth of Heat Entrance Concept art of a bridge over a canyon Concept art of the front of a lodge

Q&A With Ty Hegner: Senior Environment Artist

Recently I had the pleasure of interviewing our Senior Environment Artist, Ty Hegner, for the Blog. With this interview, I wanted to give readers a look at what it’s like to work on Survival Master as an Environment Artist. This is the first in a series of Q&A sessions, so please enjoy and leave a comment if you have any questions for the team that you would like to see in future installations!

Q) How long have you been working on this project?
A) I am in the middle of the second year I believe.  I joined at the end of 2008.

Q) What sort of education and work experience did you have coming into Survival Master?
A) Well, I am a graduate from the University of California, Santa Barbara where I studied art.  Out of school I began working mostly in print and web graphics until I decided that what I really wanted to do was animate.  That led me back to school were I began learning as much as I could about anything and everything 3D.  At the local city college is where I was introduced to game design.  Having been a gamer most of my life and intensely interested in 3D,  the fit to game design seemed really natural.  Before joining this project, I was working on another serious game project for the Santa Barbara City College which launched this past November.

Q) What’s an average week like as Senior Environment Artist?
A) The average week is a lot of phone and web meetings.  Being that most of the team I work with are literally spread across the nation we run a moodle to share ideas and information concerning the project. Depending on the week, usually an idea is talked about and thought out before we do any actual hands on work.  Once we establish what needs to be made, myself or one of the team members will then fleshed out via a good old pencil and paper and then post it on the moodle for feedback.  Often times a design my get worked over once or twice before it gets the go ahead or you my run 2 or 3 ideas past people to get exact feel for what feels correct concerning design color and shape.  If the assets gets the ok, we then dial in any last minute changes, export it and upload it to an ftp site where it is ready for the game engine. That is a lot of the process and depending on the conversation my weekly work flow changes accordingly.

Q) What’s your favorite thing that you’ve made so far?
A) That’s a hard question.  I think I get new favorites all the time. Usually, whatever I am working on becomes my favorite simply because of the challenge of figuring out how to make the object.  The challenge is making it functional but keep the poly count low and design appealing.  For example, I recently made a sheet of cracked ice that is designed to break into shards.  Nothing too exciting in the texture department but the puzzle of making it look and function right was fun for me.  Other than that, if I had to pick, I made a film projector that I thought was cool, it had a neat texture and was fun to design.

Q) What are you most looking forward to working on in the future for Survival Master.
A) At this point,  I am really looking forward to seeing KSB2 take flight and become playable.  When you actually get to play a level, you really get to see how the assets work or in some cases don’t… That is where the real joy comes for me.  The point at which you get to see the world you’ve been creating come alive.

Q) What software do you use?
A) I am most comfortable using Maya and Photoshop but I have also use 3D Max for some things.

Q) Can you describe your workflow when creating a level?
A) Creating a level is a little challenging.  There are certain game play mechanics that have to be met when creating a serious game. Beside your standard game mechanics you have the curriculum and in a serious game the curriculum reigns supreme.  If the curriculum doesn’t get through the whole game may as well not exist.  So first you have to make sure the curriculum is in place before you start to create a single poly.  Often and more than not though, there is a lot of wiggle room which is great because that is where you get to add the bells and whistles.  In this project, things are always in constant discussions so we tend to build things in components rather than complete units. That way we have a lot more flexibility to move and add things as the discussion moves forward.  Past that, its sketch, build, test, rinse and repeat.

Q) How long does it usually take you to make a prototype prop from start to finish?
A) That’s an answer that really depends.  If it is a simple prop usually I can conceive and produce the rough in a couple of hours.  If it is a more complex object that has moving pieces and or specific needs to be met, it may take me a day.  Usually I try a few different approaches to get the best result. Also Texturing an object may take a few hours too depending on the complexity.  If it’s a larger asset like a level it takes much longer because there are a lot more factors to consider.  Rule of thumb, however long you think it is going to take, double it.

Q) How long have you been working on this project?

A) I am in the middle of the second year I believe.  I joined at the end of 2008

Q) What sort of education and work experience did you have coming into
Survival Master?

A) Well, I am a graduate from the University of California, Santa
Barbara
where I studied art.  Out of school I began working mostly in
print and web graphics until I decided that what I really wanted to do
was animate.  That led me back to school were I began learning as much
as I could about anything and everything 3D.  At the local city
college is where I was introduced to game design.  Having been a gamer
most of my life and intensely interested in 3D,  the fit to game
design
seemed really natural.  Before joining this project, I was
working on another serious game project for the Santa Barbara City
College
which launched this past November

Q) What’s an average week like as Senior Environment Artist?

A) The average week is a lot of phone and web meetings.  Being that
most of the team I work with are literally spread across the nation we
run a moodle to share ideas and information concerning the project.
Depending on the week, usually an idea is talked about and thought out
before we do any actual hands on work.  Once we establish what needs
to be made, myself or one of the team members will then fleshed out
via a good old pencil and paper and then post it on the moodle for
feedback.  Often times a design my get worked over once or twice
before it gets the go ahead or you my run 2 or 3 ideas past people to
get exact feel for what feels correct concerning design color and
shape.  If the assets gets the ok, we then dial in any last minute
changes, export it and upload it to an ftp site where it is ready for
the game engine. That is a lot of the process and depending on the
conversation my weekly work flow changes accordingly.

Q) What’s your favorite thing that you’ve made so far?

A) That’s a hard question.  I think I get new favorites all the time.
Usually, whatever I am working on becomes my favorite simply because
of the challenge of figuring out how to make the object.  The
challenge is making it functional but keep the poly count low and
design appealing.  For example, I recently made a sheet of cracked ice
that is designed to break into shards.  Nothing to exciting in the
texture department but the puzzle of making it look and function right
was fun for me.  Other than that, if I had to pick, I made a film
projector that I thought was cool, it had a neat texture and was fun
to design.

Q)What are you most looking forward to working on in the future for
Survival Master.

A) At this point,  I am really looking forward to seeing KSB2 take
flight and become playable.  When you actually get to play a level,
you really get to see how the assets work or in some cases don’t…
That is where the real joy comes for me.  The point at which you get
to see the world you’ve been creating come alive.

What software do you use?  I am most comfortable using Maya and
Photoshop but I have also use 3D Max for somethings.

Q) Can you describe your workflow when creating a level?

A) Creating a level is a little challenging.  There are certain game
play mechanics that have to be met when creating a serious game.
Beside your standard game mechanics you have the curriculum and in a
serious game the curriculum reigns supreme.  If the curriculum doesn’t
get through the whole game may as well not exist.  So first you have
to make sure the curriculum is in place before you start to create a
single poly.  Often and more than not though, there is a lot of wiggle
room which is great because that is where you get to add the bells and
whistles.  In this project, things are always in constant discussions
so we tend to build things in components rather than complete units.
That way we have a lot more flexibility to move and add things as the
discussion moves forward.  Past that, its sketch, build, test, rinse
and repeat.

Q) How long does it usually take you to make a prototype prop from
start to finish?

A) That’s an answer that really depends.  If it is a simple prop
usually I can conceive and produce the rough in a couple of hours.  If
it is a more complex object that has moving pieces and or specific
needs to be met, it may take me a day.  Usually I try a few different
approaches to get the best result. Also Texturing an object may take a
few hours too depending on the complexity.  If it’s a larger asset
like a level it takes much longer because there are a lot more factors
to consider.  Rule of thumb, however long you think it is going to
take, double it.
Team Meeting – Playtests, Gameplay, and Curriculum

[Tutorial] Objectives

Agenda

February Playtest
Spring 2010 Playtest Milestones/Schedule Update
Physical Modeling Curriculum Design WIP for KSB 4
Multiplayer Game Design Concept WIP
KSB 4 Gameplay Design WIP

This week the pilot teachers and students are testing our partial alpha build. On the 1st it will be open to the general public for testing (under a different moodle course so we don’t mix the student testing data with the public data). We reviewed Moodle functionality, what information it logs, and the graphical improvements we have made to the text for the players.

KSB3 (The Snowshoe Race) should be updated again in the morning so the team can play through the changes made. We talked about plans for the internal test in March. Our goal is to have the snowboard freeplay part ready to play then, as well as KSB 2 (Labyrinth of Heat).

We chatted about  some details for KSB 4 and its Physical Modeling Curriculum, and then talked about some of the proposed KSB 4 ideas in gameplay.  It’s always a struggle for us when designing these things because all of the KSBs are there for the purpose of teaching the player enough so he or she can succeed in the multiplayer portion. Since we don’t have the multiplayer physical modeling curriculum fully fleshed out, it’s been especially difficult for us to know what information to include in KSB 4 and what gameplay would support our learning objectives.

In the past we have questioned the necessity of including KSB 4 but ultimately concluded that it would be important to have since it goes over information the other 3 KSBs do not. The other KSBs also did not relate as directly to the multiplayer portion, so those designs went (relatively) smoothly. Since we’re a bit stuck at the moment, we’ve decided to postpone returning to KSB4 and the multiplayer until sometime in March. Hopefully by then we’ll have more information on the Physical Modeling curriculum and how to better incorporate that into KSB 4.

Throughout our discussion we kept getting strange feedback/static on the call, probably from computer speakers or a bluetooth headset. Ah, the quirks of having meetings over the phone. Our next meeting will focus exclusively on the March playtest, and once the February playtest goes public we can publish the details here. Keep an eye out for a post next week about it!

General Meeting – Milestones and Design chat

No meeting last Thursday due to weather and technology clashing. Our next Design meeting will be on the 4th. To start this meeting off, we went over some upcoming milestones we’d like to hit. The first is an open playtest this Friday for KSBs 1 and 2. There will be one in February for KSB 3 and another in March for KSB 4.

We then briefly went over our QA database and how we want the team to use it. There will be an instructional video to go along with the database so it’s easy to learn. We’re anticipating team members using it to report bugs when we do the playtests, but also have hopes that it will be simple enough to learn where the Teachers in the field tests will be able to contribute to it as well.

There was a brief discussion on the Physical (real world) Modeling Curriculum Design. Since one of the goals of our project is to parallel every exercise in game with one in real life, and see which method is most effective, we needed to talk about how similar the content of the two exercises needed to be. Another thing that came up was if we needed a third activity that blended the two (physical and virtual). And how will we support the Physical portion of the game? Through the use of a Moodle? Something that needs to be considered in the future when we dig deeper into this issue.

Moving along, Jim proposed the idea to the team of implementing the Multiplayer in Second Life. It offers some distinct advantages and disadvantages.

Pros:

  • Shorter Dev Cycle
  • Leverage COTS Technology (VoIP, SLOODLE, SLscripts)
  • Lower Support Costs (IT and Community)
  • Easier Community Management

Cons:

  • Less Access to Data – it isn’t on our server, use scripts to capture
  • Teen Grid Access – staff will need to be authorized
  • Lower Production Value

No decision needed to be made today, but something to chew on for future meetings.

The Design team resumed discussion on KSB 4, the water tower building activity. They’ve been working on making it more fun and challenging for the player.  After that, it was time for Multiplayer talks again, this time about general game sequence and player activities.

Our next scheduled meeting is for the Development Team on Tuesday the 26th, weather permitting.

Development Team Meeting – KSB3+

Due to unknown circumstances, we were unable to webcast today so it was a phone meeting only. That means no meeting recording either, which is a pity since we discussed a major change to our character animation workflow and rig.

Despite the technical issues, we had a full meeting with plenty of new stuff to go over and continuing tasks to finish. Next week we’ll be ramping up playtesting on KSB3 (the Snowshoe Race), first with small internal testing and tutorial video making, and ending the week with an open playtest on Friday. We’ll post more about the playtest next week, and also tweet our updates.

Kyle Bean is our master QA, Dialogue, and Game Design guy. For KSB3 he’ll be working on the tutorial videos that will be seen before the player starts the game. He’ll also be developing the entrance and exit questions, and the Project Testing Database System Presentation. Ty Hegner is our amazing Environment Artist and Musician. He’s working on the gray level for KSB 2, various game props, and in-game instructional videos. And Cecilia Mason is our awesome Art Director and Character Animator. She’s working on various environment props, establishing web content, and also re-rigging and re-animating the male snowboarder character (player avatar).

To elaborate on the decision to re-rig the snowboarder, the old rig was… old. It would need some significant modifications in order to add all of the functionality that was required, and most of the mocap data that needed that particular rig was dense and could have used some serious cleanup in order to lower file size. Since we had so many unique actions that were destined for hand animation anyway, we decided to push forward with the change in direction. Cecilia will create a new rig in Maya, then bring it into Motion Builder so we can share the rig between all team members with a variety of software. We’ll post a workflow video to our youtube channel once we make the shift.

Our next meeting is this Thursday for Design. See you then!

Meeting Schedule and Art Update


KSB2E_Cavern2

Originally uploaded by Gaming2Learn

Just a quick update to make up for last week. Our meeting schedule has reverted back to the old one, where instead of meeting every Monday for General and Design related things, we have one meeting a week – every other Monday and every other Thursday for General/Design stuff (if that all makes sense). Every Tuesday is when the development team gets together to assign tasks for the week and give status updates.

Also, check out our recently updated Flickr account. We’re currently working on getting art and photos from the Survival Master Alpha stage up. More to come soon!

Team Meeting: Multiplayer

shelter frame

Our first meeting of the new  year kicked off with us getting right back into the design of the Multiplayer component.

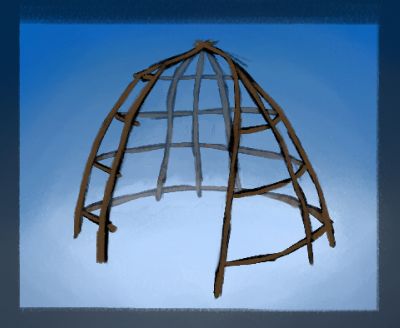
The design team began with an overview of plot motivation behind the Shelter Design activity and basic activities that should go on during this part of the game.  We know that the team of 4 players will need to design and build a survival shelter based on what they’ve learned so far, and survive for 3 nights while the shelter is put through some strain. The gameplay has been broken up into 9 team activities to be completed within several class sessions.

We focused on questions that came up during the design process. Here is a list of the general questions asked:

Game Play Setup:
Teams of 4
Questions/Concerns/Comments

  • What if there are an uneven amount of students?
  • What if students are absent for illness, out of classroom activities, etc.?
  • Can the system play as a missing student?
  • Can the system recalculate for 3 (or 5, etc.) team member efforts?
  • Roles?
  • Without roles how will work be divided?
  • Can the system divide work tasks evenly between team members? Ex. Once a team decision has been made (e.g. Insulating materials) can the system divide up the number of tasks needed to insulate the shelter and distribute them evenly within the team – popping up each member’s task on their screen?
  • Is there a way to make teams include students from various skill levels to ensure the teams have an equal chance?
  • What will the students do while waiting for teams to be formed? Snowboard?
  • What do teams do if they finish before the other teams?

Saving

  • Questions/Concerns/Comments
  • Is the game continually saving team progress?
  • If any of the teams need to retry in the activities below, how far back do they need to go?
  • We need to determine the average in-game time amounts per class period.

For the rest of the meeting, we discussed many of the questions in-depth. Good progress was made today, but we still have much work ahead in order to finalize the game design.  This will be continued in next week’s meeting.

Game Play Setup:

  • Teams of 4

Questions/Concerns/Comments

  • What if there are an uneven amount of students?

  • What if students are absent for illness, out of classroom activities, etc.?

    • Can the system play as a missing student?

    • Can the system recalculate for 3 (or 5, etc.) team member efforts?

  • Roles?

    • Without roles how will work be divided?

    • Can the system divide work tasks evenly between team members? Ex. Once a team decision has been made (e.g. Insulating materials) can the system divide up the number of tasks needed to insulate the shelter and distribute them evenly within the team – popping up each member’s task on their screen?

    • Is there a way to make teams include students from various skill levels to ensure the teams have an equal chance?

  • What will the students do while waiting for teams to be formed? Snowboard?

  • What do teams do if they finish before the other teams?

  • ???

  • Saving

Questions/Concerns/Comments

  • Is the game continually saving team progress?

  • If any of the teams need to retry in the activities below, how far back do they need to go?

  • We need to determine the average in-game time amounts per class period.

  • ???